> ## Documentation Index
> Fetch the complete documentation index at: https://rasa.com/docs/llms.txt
> Use this file to discover all available pages before exploring further.
# Slack
> Build a Rasa Chat Bot on Slack
Connecting a bot to Slack requires you to configure it to send messages
(using API credentials) and to receive messages (using a webhook).
## Sending Messages
Create a new file `credentials.yml` in the root folder of your Rasa
project (if you've used `rasa init` this file should already exist and you can
just edit it). Add the following lines to the file:
```yaml title="credentials.yml" theme={null}
slack:
slack_channel: "CA003L0XZ" # channel ID, not a channel name!
slack_token: "xoxb-XXX" # token obtained in the next step
slack_signing_secret: "YYY" # secret obtained in the next step
```
The `slack_channel` can be a channel or an individual person that the bot should
listen to for communications, in addition to the default behavior of listening
for direct messages and app mentions, i.e. *@app\_name*.
To get a channel id, right click on the channel in Slack and choose **Copy Link**.
The id will be the last component in the URL.
In the next couple steps, you'll create a Slack App to get the values for
`slack_token` and `slack_signing_secret`:
1. To create the app go to [Your Apps](https://api.slack.com/apps "The Your Apps section of your Slack interface") and click
on **Create New App**.
 Fill out your **App Name** and select the **Development Workspace** where
you'll play around and build your app.
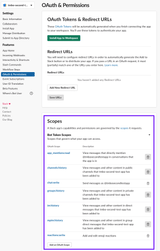
2. Head over to **OAuth & Permissions** and scroll down to **Scopes**. Scopes give
your app permission to do things in your workspace.
To get started, you should at least add the following scopes:
* `app_mentions:read`,
* `channels:history`,
* `chat:write`,
* `groups:history`,
* `im:history`,
* `mpim:history` and
* `reactions:write`.
Fill out your **App Name** and select the **Development Workspace** where
you'll play around and build your app.
2. Head over to **OAuth & Permissions** and scroll down to **Scopes**. Scopes give
your app permission to do things in your workspace.
To get started, you should at least add the following scopes:
* `app_mentions:read`,
* `channels:history`,
* `chat:write`,
* `groups:history`,
* `im:history`,
* `mpim:history` and
* `reactions:write`.
 In Slacks API documentation you can find a
[list and explanation of all available scopes](https://api.slack.com/scopes).
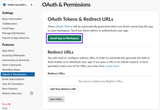
3. On the **OAuth & Permissions** page, click **Install App to Workspace** to add
the bot to your workspace.
In Slacks API documentation you can find a
[list and explanation of all available scopes](https://api.slack.com/scopes).
3. On the **OAuth & Permissions** page, click **Install App to Workspace** to add
the bot to your workspace.
 Once added, Slack will show you a **Bot User OAuth Access Token** which you'll
need to add to your `credentials.yml` as the value for `slack_token`:
```yaml title="credentials.yml" {3} theme={null}
slack:
slack_channel: "your-channel" # choose a channel for your bot
slack_token: "xoxb-XXX" # token obtained in the next step
slack_signing_secret: "YYY" # secret obtained in the next step
```
The token should start with `xoxb`.
4\. Head over to **Basic Information** to gather the **Signing Secret**.
Once added, Slack will show you a **Bot User OAuth Access Token** which you'll
need to add to your `credentials.yml` as the value for `slack_token`:
```yaml title="credentials.yml" {3} theme={null}
slack:
slack_channel: "your-channel" # choose a channel for your bot
slack_token: "xoxb-XXX" # token obtained in the next step
slack_signing_secret: "YYY" # secret obtained in the next step
```
The token should start with `xoxb`.
4\. Head over to **Basic Information** to gather the **Signing Secret**.
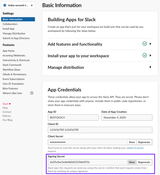 Copy the signing secret into your `credentials.yml` as the value for `slack_signing_secret`:
```yaml title="credentials.yml" {4} theme={null}
slack:
slack_channel: "your-channel" # choose a channel for your bot
slack_token: "xoxb-XXX" # token obtained in the next step
slack_signing_secret: "YYY" # secret obtained in the next step
```
This setup will allow your bot to send messages. Now let's head over to the setup
for receiving and reacting to messages.
## Receiving Messages
Before continuing, make sure you have configured a Slack App for [Sending Messages](/docs/reference/channels/slack#sending-messages) and have added Slack credentials to your `credentials.yml` file.
To receive messages, you will need a publicly available URL for Slack to reach
your bot and tell you about new messages. If you are running locally, you can
[test channels using ngrok](/docs/reference/channels/messaging-and-voice-channels#testing-channels-on-your-local-machine)
1. To configure your bot to receive messages, your bot needs to be running.
Start your bot e.g. using
```bash theme={null}
rasa run
```
If you are running locally, make sure ngrok (or another tool to retrieve a public
url) is running as well.
2\. To send messages directly to your bot using the slack UI, head to **App Home**,
scroll to the bottom and select the checkbox for
`Allow users to send Slash commands and messages from the messages tab.`
You might have to quit the Slack app and re-open it before your changes take effect.
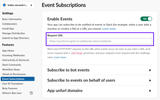
3\. Configure the webhook by heading to **Event Subscriptions** and
turning **Enable Events** on.
As a request URL enter the public url of your bot and append `/webhooks/slack/webhook`, e.g.
`https:///webhooks/slack/webhook` replacing `` with your URL. If you
are using ngrok, your url should look like `https://92832de0.ngrok.io/webhooks/slack/webhook`.
You won't be able to use a `localhost` url.
Copy the signing secret into your `credentials.yml` as the value for `slack_signing_secret`:
```yaml title="credentials.yml" {4} theme={null}
slack:
slack_channel: "your-channel" # choose a channel for your bot
slack_token: "xoxb-XXX" # token obtained in the next step
slack_signing_secret: "YYY" # secret obtained in the next step
```
This setup will allow your bot to send messages. Now let's head over to the setup
for receiving and reacting to messages.
## Receiving Messages
Before continuing, make sure you have configured a Slack App for [Sending Messages](/docs/reference/channels/slack#sending-messages) and have added Slack credentials to your `credentials.yml` file.
To receive messages, you will need a publicly available URL for Slack to reach
your bot and tell you about new messages. If you are running locally, you can
[test channels using ngrok](/docs/reference/channels/messaging-and-voice-channels#testing-channels-on-your-local-machine)
1. To configure your bot to receive messages, your bot needs to be running.
Start your bot e.g. using
```bash theme={null}
rasa run
```
If you are running locally, make sure ngrok (or another tool to retrieve a public
url) is running as well.
2\. To send messages directly to your bot using the slack UI, head to **App Home**,
scroll to the bottom and select the checkbox for
`Allow users to send Slash commands and messages from the messages tab.`
You might have to quit the Slack app and re-open it before your changes take effect.
3\. Configure the webhook by heading to **Event Subscriptions** and
turning **Enable Events** on.
As a request URL enter the public url of your bot and append `/webhooks/slack/webhook`, e.g.
`https:///webhooks/slack/webhook` replacing `` with your URL. If you
are using ngrok, your url should look like `https://92832de0.ngrok.io/webhooks/slack/webhook`.
You won't be able to use a `localhost` url.
 4\. As a last step, you'll need to **Subscribe to bot events** on the same page.
You'll need to add the following events:
* `message.channels`,
* `message.groups`,
* `message.im` and
* `message.mpim`.
4\. As a last step, you'll need to **Subscribe to bot events** on the same page.
You'll need to add the following events:
* `message.channels`,
* `message.groups`,
* `message.im` and
* `message.mpim`.
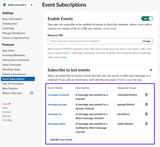 Make sure to hit **Save Changes** at the bottom of the page after you've added these events.
(If you didn't grant all required permissions to your app while setting up
sending of messages, you'll be prompted to **reinstall your app** which you will
need to do. Otherwise, Slack will confirm your change with a **Success!**)
**invite to channels**
As per [Slack docs](https://api.slack.com/messaging/sending), make
sure you invite your bot to a channel it should be accessing. You can do this
by using `/invite` in the channel.
Your bot is now ready to go and will receive webhook notifications about new messages.
## Optional: Interactive Components
After you've completed [Sending Messages](/docs/reference/channels/slack#sending-messages) and
[Receiving Messages](/docs/reference/channels/slack#receiving-messages) your bot is ready to go. If you
want to use Slack's [interactive components](https://api.slack.com/block-kit/interactivity) (buttons or menus), you'll need to do
some additional configuration:
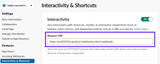
Open the **Interactivity & Shortcuts** page and toggle **Interactivity** to be on.
Afterwards, you'll need to enter the same url into the **Request URL** field which
you used in Step 2 of [Receiving Messages](/docs/reference/channels/slack#receiving-messages), e.g. `https:///webhooks/slack/webhook`.
Make sure to hit **Save Changes** at the bottom of the page after you've added these events.
(If you didn't grant all required permissions to your app while setting up
sending of messages, you'll be prompted to **reinstall your app** which you will
need to do. Otherwise, Slack will confirm your change with a **Success!**)
**invite to channels**
As per [Slack docs](https://api.slack.com/messaging/sending), make
sure you invite your bot to a channel it should be accessing. You can do this
by using `/invite` in the channel.
Your bot is now ready to go and will receive webhook notifications about new messages.
## Optional: Interactive Components
After you've completed [Sending Messages](/docs/reference/channels/slack#sending-messages) and
[Receiving Messages](/docs/reference/channels/slack#receiving-messages) your bot is ready to go. If you
want to use Slack's [interactive components](https://api.slack.com/block-kit/interactivity) (buttons or menus), you'll need to do
some additional configuration:
Open the **Interactivity & Shortcuts** page and toggle **Interactivity** to be on.
Afterwards, you'll need to enter the same url into the **Request URL** field which
you used in Step 2 of [Receiving Messages](/docs/reference/channels/slack#receiving-messages), e.g. `https:///webhooks/slack/webhook`.
 ## Additional Slack Options
Here is a complete overview of all the configuration parameters for the Slack
connection:
```yaml title="credentials.yml" theme={null}
slack:
slack_channel: "CA003L0XZ" # channel ID, not a channel name!
slack_token: "xoxb-XXX" # token obtained in the next step
slack_signing_secret: "YYY" # secret obtained in the next step
proxy: "http://myProxy.online" # Proxy Server to route your traffic through. This configuration is optional. Only HTTP proxies are supported
slack_retry_reason_header: "x-slack-retry-reason" # Slack HTTP header name indicating reason that slack send retry request. This configuration is optional.
slack_retry_number_header: "x-slack-retry-num" # Slack HTTP header name indicating the attempt number. This configuration is optional.
errors_ignore_retry: None # Any error codes given by Slack included in this list will be ignored. Error codes are listed [here](https://api.slack.com/events-api#errors).
use_threads: False # If set to True, bot responses will appear as a threaded message in Slack. This configuration is optional and set to False by default.
conversation_granularity: "sender" # sender allows 1 conversation per user (across channels), channel allows 1 conversation per user per channel, thread allows 1 conversation per user per thread. This configuration is optional and set to sender by default.
```
Make sure to restart your Rasa server after changing the
`credentials.yml` for the changes to take effect.
## Related topics
- [Rasa Pro Change Log](/docs/reference/changelogs/rasa-pro-changelog.md)
- [Connecting to Messaging and Voice Channels](/docs/reference/channels/messaging-and-voice-channels.md)
- [Analytics Pipeline: Data Structure Reference](/docs/reference/api/analytics-data-structure-reference.md)
- [Responses](/docs/reference/primitives/responses.md)
- [Set Up Your Agent on GCP](/docs/learn/deployment/gcp/gcp-playbook-setup-agent.md)
## Additional Slack Options
Here is a complete overview of all the configuration parameters for the Slack
connection:
```yaml title="credentials.yml" theme={null}
slack:
slack_channel: "CA003L0XZ" # channel ID, not a channel name!
slack_token: "xoxb-XXX" # token obtained in the next step
slack_signing_secret: "YYY" # secret obtained in the next step
proxy: "http://myProxy.online" # Proxy Server to route your traffic through. This configuration is optional. Only HTTP proxies are supported
slack_retry_reason_header: "x-slack-retry-reason" # Slack HTTP header name indicating reason that slack send retry request. This configuration is optional.
slack_retry_number_header: "x-slack-retry-num" # Slack HTTP header name indicating the attempt number. This configuration is optional.
errors_ignore_retry: None # Any error codes given by Slack included in this list will be ignored. Error codes are listed [here](https://api.slack.com/events-api#errors).
use_threads: False # If set to True, bot responses will appear as a threaded message in Slack. This configuration is optional and set to False by default.
conversation_granularity: "sender" # sender allows 1 conversation per user (across channels), channel allows 1 conversation per user per channel, thread allows 1 conversation per user per thread. This configuration is optional and set to sender by default.
```
Make sure to restart your Rasa server after changing the
`credentials.yml` for the changes to take effect.
## Related topics
- [Rasa Pro Change Log](/docs/reference/changelogs/rasa-pro-changelog.md)
- [Connecting to Messaging and Voice Channels](/docs/reference/channels/messaging-and-voice-channels.md)
- [Analytics Pipeline: Data Structure Reference](/docs/reference/api/analytics-data-structure-reference.md)
- [Responses](/docs/reference/primitives/responses.md)
- [Set Up Your Agent on GCP](/docs/learn/deployment/gcp/gcp-playbook-setup-agent.md)