> ## Documentation Index
> Fetch the complete documentation index at: https://rasa.com/docs/llms.txt
> Use this file to discover all available pages before exploring further.
# Rasa Tutorial
> This quickstart takes you from an initial setup to a functional AI agent.
## Requirements
Before getting started, make sure that you've already:
* [**Created a License Key**](/docs/pro/installation/licensing)
* [**Installed Rasa**](/docs/pro/installation/python)
## What are you building?
In this tutorial, you will build an LLM-powered assistant that can complete a money transfer,
reliably executing your business logic while allowing for fluid conversation.
Here are some of the conversations your assistant will be able to handle after you define the money transfer process:
User: I want to send money
Bot: Who would you like to send money to?
User: to Jen
Bot: How much would you like to send?
User: \$50
Bot:
Please confirm: you want to transfer \$50.0 to Jen?
User: yes
Bot: All done. \$50.0 has been sent to Jen.
Bot: Is there anything else I can help you with?!
happy path
User: I want to send 100 dollars to Joe
Bot:
Please confirm: you want to transfer \$100.0 to Joe?
User: yes.
Bot: All done. \$100.00 has been sent to Joe.
Bot: Is there anything else I can help you with?
All info given
User: I need to send \$50
Bot: Who would you like to send money to?
User: Jen
Bot:
Please confirm: you want to transfer \$50.0 to Jen?
User: actually no 60
Bot: Ok, I corrected the amount.
Bot:
Please confirm: you want to transfer \$60.0 to Jen?
User: yes.
Bot: All done. \$60.00 has been sent to Jen.
Bot: Is there anything else I can help you with?
Change of mind
## Following This Tutorial
You'll need a free Rasa [Developer Edition license](/docs/pro/installation/licensing)
This tutorial contains a mix of explanations and instructions.
Whenever there are instructions you need to follow, you'll see this 'Action Required' label:
Action Required
This assistant is powered by [an LLM that we fine-tuned and uploaded to huggingface](https://huggingface.co/rasa/command-generator-llama-3.1-8b-instruct).
For convenience, this tutorial will use a deployment that we host and make available for users working through the tutorial.
If you prefer not to use a third-party API, you can [run this model yourself](/docs/pro/deploy/deploy-fine-tuned-model).
or use [another LLM](/docs/reference/config/components/llm-configuration)
## Setup
Action Required
For new users, the easiest way to get started is the [Developer Quickstart](/docs/learn/quickstart/pro) — get a license, install Rasa Pro, and set up MCP in your IDE.
You can also [install Rasa Pro locally](/docs/pro/installation/overview) and use your own machine.
To code along with this tutorial, navigate to an empty directory in your terminal, and run:
```bash theme={null}
rasa init --template tutorial
```
If you've completed the [Developer Quickstart](/docs/learn/quickstart/pro), you already have your license and MCP set up.
If you've installed Rasa locally, set your Rasa license in an environment variable:
```shell theme={null}
export RASA_LICENSE="your-rasa-pro-license-key"
```
```shell theme={null}
setx RASA_LICENSE your-rasa-license-key
```
The variable will now be correctly set when you create a new cmd prompt window.
Remember to replace `your-rasa-license-key` with the your actual license key.
## Overview
Open up the project folder in your IDE to see the files that make up your new project.
In this tutorial you will primarily work with the following files:
* `data/flows.yml`
* `domain.yml`
* `actions/actions.py`
## Testing your money transfer flow
Action Required
Train your assistant by running:
```bash theme={null}
rasa train
```
Now, try telling the assistant that you'd like to transfer some money to a friend.
Start talking to it in the browser by running:
```bash theme={null}
rasa inspect
```
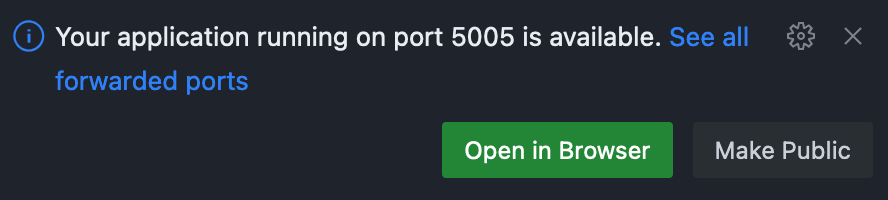
When you run the `rasa inspect` command in a GitHub Codespace, you'll see a notification
that your application is available on port 5005.
Click 'Open in Browser' to access the inspector and start chatting.
 This template bot responds to chitchat by generating a response.
If you want to disable this, delete the file `data/patterns.yml` and re-train.
## Understanding your money transfer flow
The file `data/flows.yml` contains the definition of a `flow` called `transfer_money`.
Let's look at this definition to see what is going on:
```yaml title="flows.yml" theme={null}
flows:
transfer_money:
description: Help users send money to friends and family.
steps:
- collect: recipient
- collect: amount
description: the number of US dollars to send
- action: utter_transfer_complete
```
The two key attributes of the `transfer_money` flow are the `description` and the `steps`.
The `description` is used to help decide *when* to activate this flow.
But it is also helpful for anyone who inspects your code to understand what is going on.
If a user says "I need to transfer some money", the description helps Rasa understand that this is the relevant flow.
The `steps` describe the business logic required to do what the user asked for.
The first step in your flow is a `collect` step, which is used to fill a `slot`.
A `collect` step sends a message to the user requesting information, and waits for an answer.
## Collecting Information in Slots
`Slots` are variables that your assistant can read and write throughout a conversation.
Slots are defined in your `domain.yml` file. For example, the definition of your `recipient` slot looks like this:
```yaml title="domain.yml" theme={null}
slots:
recipient:
type: text
mappings:
- type: from_llm
# ...
```
Slots can be used to store information that users provide during the conversation,
or information that has been fetched via an API call.
First, you're going to see how to store information provided by the end user in a slot.
To do this, you define a `collect` step like the first step in your flow above.
```yaml title="flows.yml" {5} theme={null}
flows:
transfer_money:
description: Help users send money to friends and family.
steps:
- collect: recipient
- collect: amount
description: the number of US dollars to send
- action: utter_transfer_complete
```
Rasa will look for a `response` called `utter_ask_recipient` in your domain file and use this to
phrase the question to the user.
```yaml title="domain.yml" theme={null}
responses:
utter_ask_recipient:
- text: "Who would you like to send money to?"
```
After sending this message, Rasa will wait for a response from the user.
When the user responds, Rasa will try to use their answer to fill the slot `recipient`.
Read about [slot validation](/docs/reference/primitives/flow-steps#slot-validation) to learn how you
can run extra checks on the slot values Rasa has extracted.
The diagram below summarizes how slot values are used to collect and store information,
and how they can be used to create branching logic.
This template bot responds to chitchat by generating a response.
If you want to disable this, delete the file `data/patterns.yml` and re-train.
## Understanding your money transfer flow
The file `data/flows.yml` contains the definition of a `flow` called `transfer_money`.
Let's look at this definition to see what is going on:
```yaml title="flows.yml" theme={null}
flows:
transfer_money:
description: Help users send money to friends and family.
steps:
- collect: recipient
- collect: amount
description: the number of US dollars to send
- action: utter_transfer_complete
```
The two key attributes of the `transfer_money` flow are the `description` and the `steps`.
The `description` is used to help decide *when* to activate this flow.
But it is also helpful for anyone who inspects your code to understand what is going on.
If a user says "I need to transfer some money", the description helps Rasa understand that this is the relevant flow.
The `steps` describe the business logic required to do what the user asked for.
The first step in your flow is a `collect` step, which is used to fill a `slot`.
A `collect` step sends a message to the user requesting information, and waits for an answer.
## Collecting Information in Slots
`Slots` are variables that your assistant can read and write throughout a conversation.
Slots are defined in your `domain.yml` file. For example, the definition of your `recipient` slot looks like this:
```yaml title="domain.yml" theme={null}
slots:
recipient:
type: text
mappings:
- type: from_llm
# ...
```
Slots can be used to store information that users provide during the conversation,
or information that has been fetched via an API call.
First, you're going to see how to store information provided by the end user in a slot.
To do this, you define a `collect` step like the first step in your flow above.
```yaml title="flows.yml" {5} theme={null}
flows:
transfer_money:
description: Help users send money to friends and family.
steps:
- collect: recipient
- collect: amount
description: the number of US dollars to send
- action: utter_transfer_complete
```
Rasa will look for a `response` called `utter_ask_recipient` in your domain file and use this to
phrase the question to the user.
```yaml title="domain.yml" theme={null}
responses:
utter_ask_recipient:
- text: "Who would you like to send money to?"
```
After sending this message, Rasa will wait for a response from the user.
When the user responds, Rasa will try to use their answer to fill the slot `recipient`.
Read about [slot validation](/docs/reference/primitives/flow-steps#slot-validation) to learn how you
can run extra checks on the slot values Rasa has extracted.
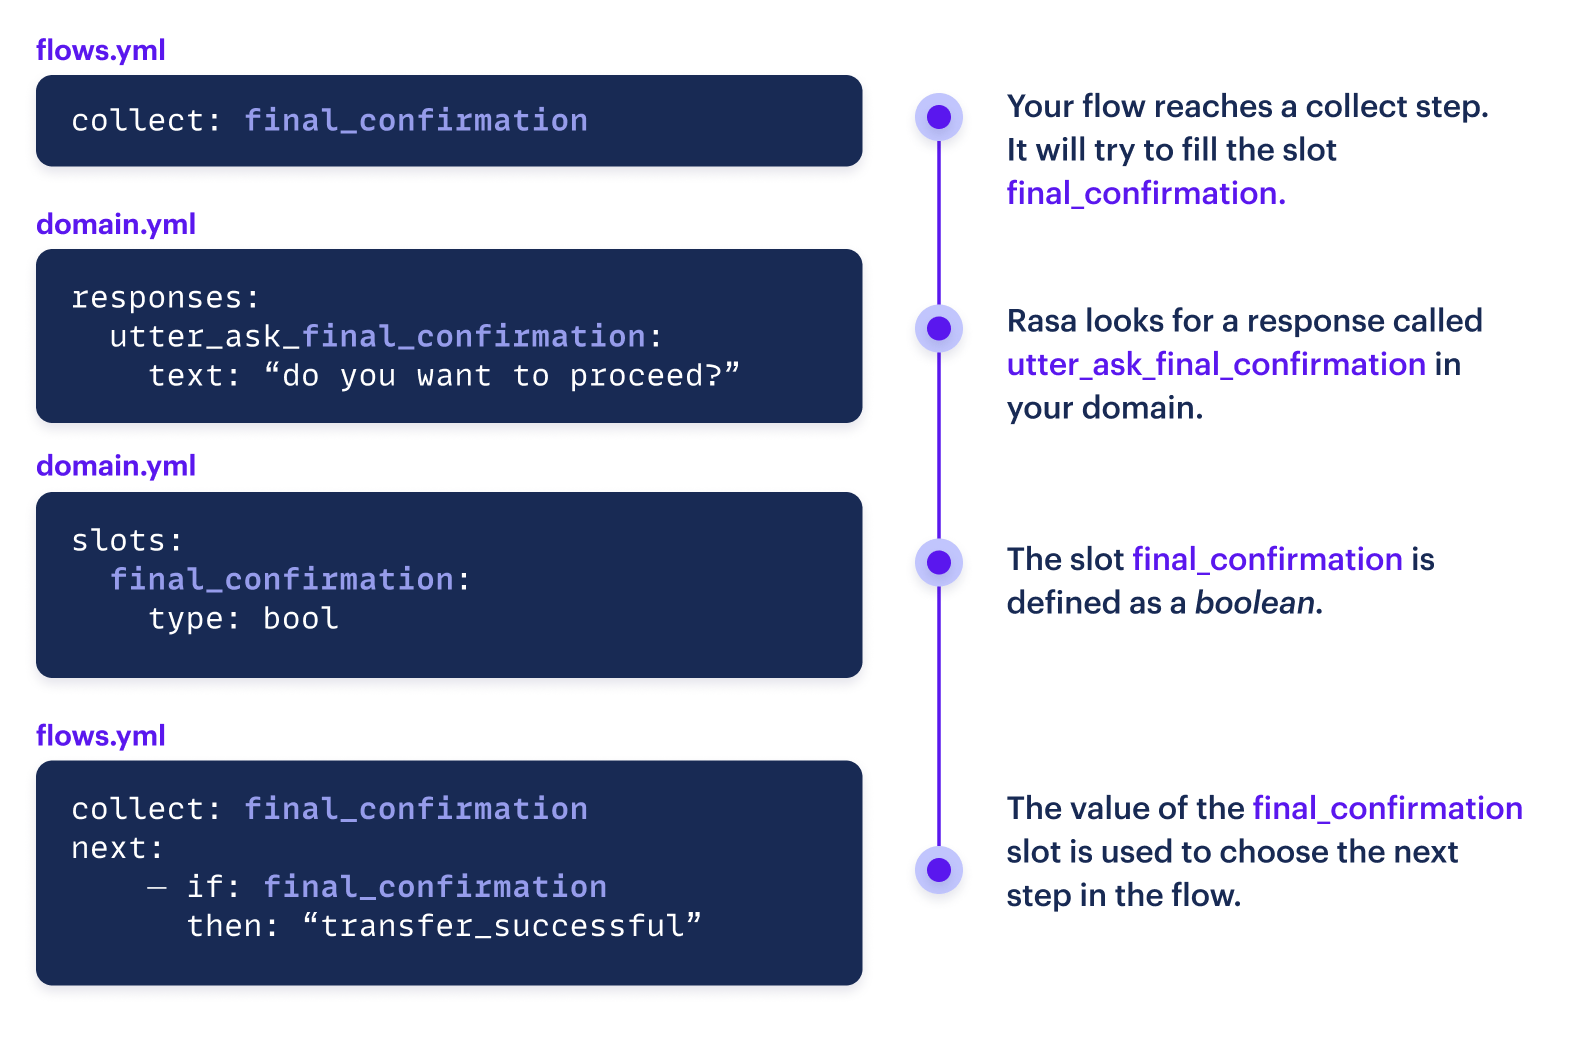
The diagram below summarizes how slot values are used to collect and store information,
and how they can be used to create branching logic.
 ### Descriptions in collect steps
The second `collect` step includes a description of the information your assistant
will request from the user.
Descriptions are optional, but can help Rasa extract slot values more reliably.
```yaml title="flows.yml" {7} theme={null}
flows:
transfer_money:
description: Help users send money to friends and family.
steps:
- collect: recipient
- collect: amount
description: the number of US dollars to send
- action: utter_transfer_complete
```
## Action Steps
The third `step` in your `transfer_money` flow is not a `collect` step but an `action` step.
When you reach an action step in a flow, your assistant will execute the corresponding action and then
proceed to the next step.
It will not stop to wait for the user's next message.
For now, this is the final step in the flow, so there is no next step to execute and the flow completes.
```yaml title="flows.yml" {8} theme={null}
flows:
transfer_money:
description: Help users send money to friends and family.
steps:
- collect: recipient
- collect: amount
description: the number of US dollars to send
- action: utter_transfer_complete
```
## Branching Logic
Slots are also used to build branching logic in flows.
Action Required
You're going to introduce an extra step to your flow, asking the user to confirm the amount
and the recipient before sending the transfer.
Since you are asking a yes/no question, you can store the result in a boolean `slot`
which you will call `final_confirmation`.
In your domain file, add the definition of the `final_confirmation` slot
and the corresponding response: `utter_ask_final_confirmation`.
Also add a response to confirm the transfer has been cancelled.
```yaml title="domain.yml" {7-10} theme={null}
slots:
recipient:
type: Text
mappings:
- type: from_llm
# ...
final_confirmation:
type: bool
mappings:
- type: from_llm
```
```yaml title="domain.yml" {5-8} theme={null}
responses:
utter_ask_recipient:
- text: "Who would you like to send money to?"
# ...
utter_ask_final_confirmation:
- text: "Please confirm: you want to transfer {amount} to {recipient}?"
utter_transfer_cancelled:
- text: "Your transfer has been cancelled."
```
Notice that your confirmation question uses curly brackets `{}` to include slot values in your response.
Add a `collect` step to your flow for the slot `final_confirmation`.
This step includes a `next` attribute with your branching logic.
The expression after the `if` key will be evaluated to true or false to determine
the next step in your flow.
The `then` and `else` keys can contain either a list of steps or the `id` of a step
to jump to.
In this case, the `then` key contains an `action` step to inform the user their transfer
was cancelled. The `else` key contains the id `transfer_successful`.
Notice that you've added this `id` to the final step in your flow.
```yaml title="flows.yml" {8-14,16} theme={null}
flows:
transfer_money:
description: Help users send money to friends and family.
steps:
- collect: recipient
- collect: amount
description: the number of US dollars to send
- collect: final_confirmation
next:
- if: not slots.final_confirmation
then:
- action: utter_transfer_cancelled
next: END
- else: transfer_successful
- action: utter_transfer_complete
id: transfer_successful
```
To try out the updated version of your assistant, run `rasa train`, and then `rasa inspect` to talk to your assistant.
It should now ask you to confirm before completing the transfer.
## Integrating an API call
An `action` step in a flow can describe two types of actions.
If the name of the action starts with `utter_`, then this action sends a message to the user.
The name of the action has to match the name of one of the `responses` defined in your domain.
The final step in your flow contains the action `utter_transfer_complete`, and this response is
also defined in your domain. Responses can contain buttons, images, and custom payloads.
You can learn more about everything you can do with responses [here](/docs/reference/primitives/responses).
The second type of `action` is a custom action. The name of a custom action starts with `action_`.
You are going to create a custom action, `action_check_sufficient_funds`, to check whether the
user has enough money to make the transfer, and then add logic to your flow to handle both cases.
Your custom action is defined in the file `actions/actions.py`.
To learn more about custom actions, go [here](/docs/reference/primitives/custom-actions).
Your `actions.py` file should look like this:
```python title="actions.py" theme={null}
from typing import Any, Text, Dict, List
from rasa_sdk import Action, Tracker
from rasa_sdk.executor import CollectingDispatcher
from rasa_sdk.events import SlotSet
class ActionCheckSufficientFunds(Action):
def name(self) -> Text:
return "action_check_sufficient_funds"
def run(self, dispatcher: CollectingDispatcher,
tracker: Tracker,
domain: Dict[Text, Any]) -> List[Dict[Text, Any]]:
# hard-coded balance for tutorial purposes. in production this
# would be retrieved from a database or an API
balance = 1000
transfer_amount = tracker.get_slot("amount")
has_sufficient_funds = transfer_amount <= balance
return [SlotSet("has_sufficient_funds", has_sufficient_funds)]
```
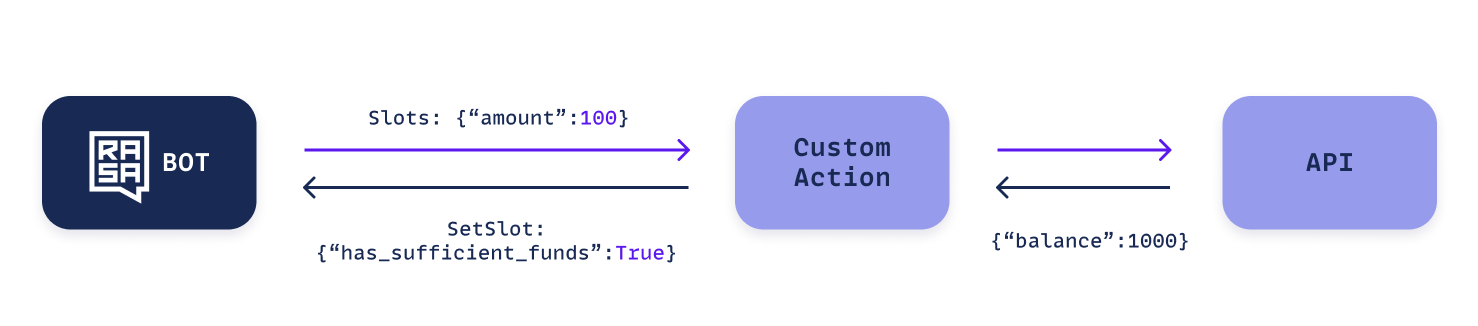
Slots are the primary way to pass information to and from custom actions.
In the `run()` method above, you access the value of the `amount` slot that was set during the conversation,
and you pass information back to the conversation by returning a `SlotSet` event to update the `has_sufficient_funds` slot.
### Descriptions in collect steps
The second `collect` step includes a description of the information your assistant
will request from the user.
Descriptions are optional, but can help Rasa extract slot values more reliably.
```yaml title="flows.yml" {7} theme={null}
flows:
transfer_money:
description: Help users send money to friends and family.
steps:
- collect: recipient
- collect: amount
description: the number of US dollars to send
- action: utter_transfer_complete
```
## Action Steps
The third `step` in your `transfer_money` flow is not a `collect` step but an `action` step.
When you reach an action step in a flow, your assistant will execute the corresponding action and then
proceed to the next step.
It will not stop to wait for the user's next message.
For now, this is the final step in the flow, so there is no next step to execute and the flow completes.
```yaml title="flows.yml" {8} theme={null}
flows:
transfer_money:
description: Help users send money to friends and family.
steps:
- collect: recipient
- collect: amount
description: the number of US dollars to send
- action: utter_transfer_complete
```
## Branching Logic
Slots are also used to build branching logic in flows.
Action Required
You're going to introduce an extra step to your flow, asking the user to confirm the amount
and the recipient before sending the transfer.
Since you are asking a yes/no question, you can store the result in a boolean `slot`
which you will call `final_confirmation`.
In your domain file, add the definition of the `final_confirmation` slot
and the corresponding response: `utter_ask_final_confirmation`.
Also add a response to confirm the transfer has been cancelled.
```yaml title="domain.yml" {7-10} theme={null}
slots:
recipient:
type: Text
mappings:
- type: from_llm
# ...
final_confirmation:
type: bool
mappings:
- type: from_llm
```
```yaml title="domain.yml" {5-8} theme={null}
responses:
utter_ask_recipient:
- text: "Who would you like to send money to?"
# ...
utter_ask_final_confirmation:
- text: "Please confirm: you want to transfer {amount} to {recipient}?"
utter_transfer_cancelled:
- text: "Your transfer has been cancelled."
```
Notice that your confirmation question uses curly brackets `{}` to include slot values in your response.
Add a `collect` step to your flow for the slot `final_confirmation`.
This step includes a `next` attribute with your branching logic.
The expression after the `if` key will be evaluated to true or false to determine
the next step in your flow.
The `then` and `else` keys can contain either a list of steps or the `id` of a step
to jump to.
In this case, the `then` key contains an `action` step to inform the user their transfer
was cancelled. The `else` key contains the id `transfer_successful`.
Notice that you've added this `id` to the final step in your flow.
```yaml title="flows.yml" {8-14,16} theme={null}
flows:
transfer_money:
description: Help users send money to friends and family.
steps:
- collect: recipient
- collect: amount
description: the number of US dollars to send
- collect: final_confirmation
next:
- if: not slots.final_confirmation
then:
- action: utter_transfer_cancelled
next: END
- else: transfer_successful
- action: utter_transfer_complete
id: transfer_successful
```
To try out the updated version of your assistant, run `rasa train`, and then `rasa inspect` to talk to your assistant.
It should now ask you to confirm before completing the transfer.
## Integrating an API call
An `action` step in a flow can describe two types of actions.
If the name of the action starts with `utter_`, then this action sends a message to the user.
The name of the action has to match the name of one of the `responses` defined in your domain.
The final step in your flow contains the action `utter_transfer_complete`, and this response is
also defined in your domain. Responses can contain buttons, images, and custom payloads.
You can learn more about everything you can do with responses [here](/docs/reference/primitives/responses).
The second type of `action` is a custom action. The name of a custom action starts with `action_`.
You are going to create a custom action, `action_check_sufficient_funds`, to check whether the
user has enough money to make the transfer, and then add logic to your flow to handle both cases.
Your custom action is defined in the file `actions/actions.py`.
To learn more about custom actions, go [here](/docs/reference/primitives/custom-actions).
Your `actions.py` file should look like this:
```python title="actions.py" theme={null}
from typing import Any, Text, Dict, List
from rasa_sdk import Action, Tracker
from rasa_sdk.executor import CollectingDispatcher
from rasa_sdk.events import SlotSet
class ActionCheckSufficientFunds(Action):
def name(self) -> Text:
return "action_check_sufficient_funds"
def run(self, dispatcher: CollectingDispatcher,
tracker: Tracker,
domain: Dict[Text, Any]) -> List[Dict[Text, Any]]:
# hard-coded balance for tutorial purposes. in production this
# would be retrieved from a database or an API
balance = 1000
transfer_amount = tracker.get_slot("amount")
has_sufficient_funds = transfer_amount <= balance
return [SlotSet("has_sufficient_funds", has_sufficient_funds)]
```
Slots are the primary way to pass information to and from custom actions.
In the `run()` method above, you access the value of the `amount` slot that was set during the conversation,
and you pass information back to the conversation by returning a `SlotSet` event to update the `has_sufficient_funds` slot.
 Action Required
Now you are going to make three additions to your `domain.yml`.
You will add a top-level section listing your custom actions.
You will add the new boolean slot `has_sufficient_funds`, and you will
add a new response to send to the user in case they do not have sufficient funds.
```yaml title="domain.yml" {1-2,6-9,13-14} theme={null}
actions:
- action_check_sufficient_funds
slots:
# ...
has_sufficient_funds:
type: bool
mappings:
- type: controlled
responses:
# ...
utter_insufficient_funds:
- text: "You do not have enough funds to make this transaction."
```
Now you are going to update your flow logic to handle the cases where the user does or does not have
enough money in their account to make the transfer.
Notice that your `collect: final_confirmation` step now also has an id so that your branching logic
can jump to it.
```yaml title="flows.yml" {8-14,16} theme={null}
flows:
transfer_money:
description: Help users send money to friends and family.
steps:
- collect: recipient
- collect: amount
description: the number of US dollars to send
- action: action_check_sufficient_funds
next:
- if: not slots.has_sufficient_funds
then:
- action: utter_insufficient_funds
next: END
- else: final_confirmation
- collect: final_confirmation
id: final_confirmation
next:
- if: not slots.final_confirmation
then:
- action: utter_transfer_cancelled
next: END
- else: transfer_successful
- action: utter_transfer_complete
id: transfer_successful
```
## Testing your Custom Action
Action Required
Double check that in the file `endpoints.yml`, that the section for your custom action server is uncommented:
```yaml title="endpoints.yml" theme={null}
action_endpoint:
actions_module: actions
```
In the terminal, stop and restart the inspector by running `rasa inspect`.
When you reach the `"check_funds"` step in your flow, Rasa will call the custom action `action_check_sufficient_funds`.
We have hardcoded the user's balance to be `1000`, so if you try to send more, the assistant will tell you that
you don't have enough funds in your account.
At this point you have experience using some of the key concepts involved in building with Rasa.
Congratulations!
## Adding Voice to Your Assistant
Now that you've built a text-based assistant that handles money transfers, let's expand its capabilities to support voice interactions.
Here's a demo of what you'll be building,
### What You'll Need for Voice
To enable voice capabilities, you'll need:
* An API key from [Deepgram](https://deepgram.com/) for both speech recognition and speech synthesis.
Alternatively, you can use any of our other supported [Speech Integrations](/docs/reference/integrations/speech-integrations).
### Setting Up Your Voice Assistant
Action Required
Configure your speech service API keys:
```shell theme={null}
export DEEPGRAM_API_KEY="your-deepgram-api-key"
```
```shell theme={null}
setx DEEPGRAM_API_KEY your-deepgram-api-key
```
This will apply to future command prompt windows, so you will need to open a new one to use these variables.
### Testing Your Voice Assistant
Action Required
To test your voice assistant in the browser, launch the Inspector as usual:
```bash theme={null}
rasa inspect
```
The Inspector includes voice by default, so you don't need an extra flag. Switch to voice from the chat input in the Inspector UI.
Try saying "I want to send money to Sarah" and experience how your assistant handles the voice interaction. The voice mode allows you to speak to your assistant and hear its responses, simulating a phone call experience.
## Next Steps
Now you are ready to apply what you've learned to building your own assistant.
1. Create a new project by running:
```
rasa init --template calm
```
2. Choose which LLM you want to use. This tutorial used an LLM that Rasa fine-tuned for this use case.
For new projects created with `rasa init --template calm`,
Rasa defaults to a general-purpose OpenAI chat model (`gpt-5.1-2025-11-13`) that doesn't require fine-tuning.
You can configure which LLM to use by editing [the config.yml file in your project](/docs/reference/config/components/llm-configuration).
When you're ready, you can [fine-tune your own model](/docs/pro/customize/fine-tuning-llm).
3. Start writing your own [flows](/docs/reference/primitives/flows) and [custom actions](/docs/reference/primitives/custom-actions).
## Related topics
- [Rasa: Code-First AI Agent Framework](/docs/pro/intro.md)
- [Rasa Pro Change Log](/docs/reference/changelogs/rasa-pro-changelog.md)
- [Your First Assistant](/docs/studio/tutorial.md)
- [Command Line Interface](/docs/reference/api/command-line-interface.md)
- [Get Started with Rasa](/docs/pro/installation/overview.md)
Action Required
Now you are going to make three additions to your `domain.yml`.
You will add a top-level section listing your custom actions.
You will add the new boolean slot `has_sufficient_funds`, and you will
add a new response to send to the user in case they do not have sufficient funds.
```yaml title="domain.yml" {1-2,6-9,13-14} theme={null}
actions:
- action_check_sufficient_funds
slots:
# ...
has_sufficient_funds:
type: bool
mappings:
- type: controlled
responses:
# ...
utter_insufficient_funds:
- text: "You do not have enough funds to make this transaction."
```
Now you are going to update your flow logic to handle the cases where the user does or does not have
enough money in their account to make the transfer.
Notice that your `collect: final_confirmation` step now also has an id so that your branching logic
can jump to it.
```yaml title="flows.yml" {8-14,16} theme={null}
flows:
transfer_money:
description: Help users send money to friends and family.
steps:
- collect: recipient
- collect: amount
description: the number of US dollars to send
- action: action_check_sufficient_funds
next:
- if: not slots.has_sufficient_funds
then:
- action: utter_insufficient_funds
next: END
- else: final_confirmation
- collect: final_confirmation
id: final_confirmation
next:
- if: not slots.final_confirmation
then:
- action: utter_transfer_cancelled
next: END
- else: transfer_successful
- action: utter_transfer_complete
id: transfer_successful
```
## Testing your Custom Action
Action Required
Double check that in the file `endpoints.yml`, that the section for your custom action server is uncommented:
```yaml title="endpoints.yml" theme={null}
action_endpoint:
actions_module: actions
```
In the terminal, stop and restart the inspector by running `rasa inspect`.
When you reach the `"check_funds"` step in your flow, Rasa will call the custom action `action_check_sufficient_funds`.
We have hardcoded the user's balance to be `1000`, so if you try to send more, the assistant will tell you that
you don't have enough funds in your account.
At this point you have experience using some of the key concepts involved in building with Rasa.
Congratulations!
## Adding Voice to Your Assistant
Now that you've built a text-based assistant that handles money transfers, let's expand its capabilities to support voice interactions.
Here's a demo of what you'll be building,
### What You'll Need for Voice
To enable voice capabilities, you'll need:
* An API key from [Deepgram](https://deepgram.com/) for both speech recognition and speech synthesis.
Alternatively, you can use any of our other supported [Speech Integrations](/docs/reference/integrations/speech-integrations).
### Setting Up Your Voice Assistant
Action Required
Configure your speech service API keys:
```shell theme={null}
export DEEPGRAM_API_KEY="your-deepgram-api-key"
```
```shell theme={null}
setx DEEPGRAM_API_KEY your-deepgram-api-key
```
This will apply to future command prompt windows, so you will need to open a new one to use these variables.
### Testing Your Voice Assistant
Action Required
To test your voice assistant in the browser, launch the Inspector as usual:
```bash theme={null}
rasa inspect
```
The Inspector includes voice by default, so you don't need an extra flag. Switch to voice from the chat input in the Inspector UI.
Try saying "I want to send money to Sarah" and experience how your assistant handles the voice interaction. The voice mode allows you to speak to your assistant and hear its responses, simulating a phone call experience.
## Next Steps
Now you are ready to apply what you've learned to building your own assistant.
1. Create a new project by running:
```
rasa init --template calm
```
2. Choose which LLM you want to use. This tutorial used an LLM that Rasa fine-tuned for this use case.
For new projects created with `rasa init --template calm`,
Rasa defaults to a general-purpose OpenAI chat model (`gpt-5.1-2025-11-13`) that doesn't require fine-tuning.
You can configure which LLM to use by editing [the config.yml file in your project](/docs/reference/config/components/llm-configuration).
When you're ready, you can [fine-tune your own model](/docs/pro/customize/fine-tuning-llm).
3. Start writing your own [flows](/docs/reference/primitives/flows) and [custom actions](/docs/reference/primitives/custom-actions).
## Related topics
- [Rasa: Code-First AI Agent Framework](/docs/pro/intro.md)
- [Rasa Pro Change Log](/docs/reference/changelogs/rasa-pro-changelog.md)
- [Your First Assistant](/docs/studio/tutorial.md)
- [Command Line Interface](/docs/reference/api/command-line-interface.md)
- [Get Started with Rasa](/docs/pro/installation/overview.md)